As your child approaches six months you may be thinking about starting solid food. You might feel unsure about what to do and/or excited about entering into this next phase with your child. Questions arise about what options you have, what you need, and how to introduce foods.
We’ve created a beginner’s guide to starting solids with a Montessori-aligned approach to help answer your questions. Baby-led weaning is often favored in Montessori as it encourages independence and respects the child’s natural development. However, we know that every family is different! That’s why we’ve included guidance for traditional feeding, purees, or a combination—so you can choose what works best for your child, all while following Montessori principles.
Where to Start
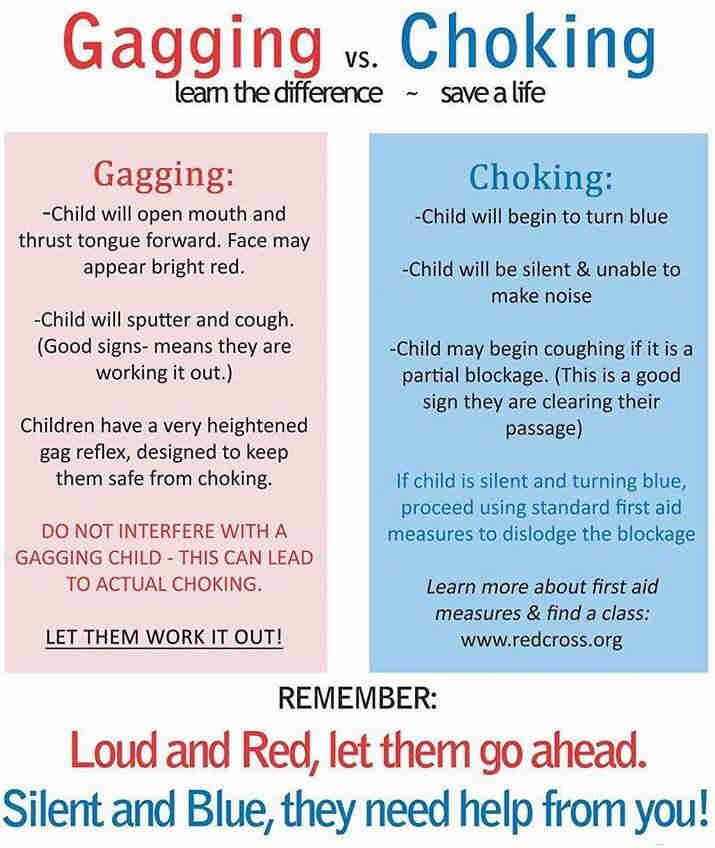
The first step in introducing solids is understanding that it’s all about exploration in the beginning. Whether you choose Baby-Led Weaning with whole foods, traditional purees, or a combination of both, the goal is to help your child develop their jaw and mouth muscles, refine their gag reflex, and get used to new textures and flavors. It’s completely normal for babies to taste, spit out, and gag as they adjust to solid foods.
Breastfeeding or formula should remain the primary source of nutrition until at least 12 months (or as recommended by your pediatrician). Around 9-10 months, some babies naturally begin to drink less milk as they eat more solids. Regardless of which method you choose, safety is key—babies can choke on whole foods and purees alike. Knowing the signs of choking and how to respond is essential. Always ensure your child is showing signs of readiness before introducing solids.
In this blog, we’ll explore both Baby-Led Weaning and purees, helping you decide what works best for your family while keeping mealtimes safe, enjoyable, and developmentally appropriate.
Tools We Recommend
Before you introduce solid foods you will need a few tools.
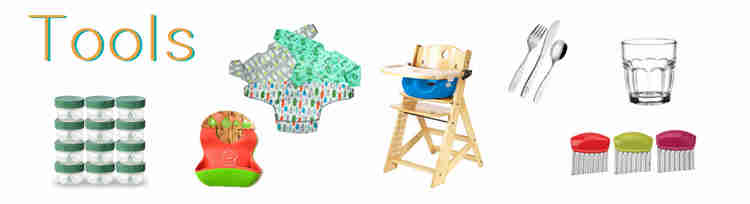
Bibs (we recommend the pocket type bibs to catch fallen food or sleeved bibs)
A highchair (suggest Stokke Tripp Trapp, Kekaroo, Kaos, Hauk) to align with Montessori but any that’s easy to clean will do. Once your child is older and can crawl into a chair at a weaning table (around 9-10 months) this is an acceptable place for feeding as well as long as they are being cautiously supervised. (We know the IKEA Antilop chair is a favourite in many homes but we would not suggest it as it does not have a foot rest, and foot rests really promotes posture when baby is sitting, helping them to sit upright and makes it easier for them to cough). Another chair we can recommend is one like this Toogel booster seat which straps to a regular dining chair and the child’s feet rests on the seat of the chair.
Child sized utensils (preferably stainless steel / metal)
Child sized cup (preferably glass or tempered glass)
Plates and bowls (more so for purees, preferably glass or porcelain)
Crinkle Cutter (if doing Baby Led Weaning)
See a FULL LIST of glasses, utensils, and other practical life goodies here.
Preparing Safe and Nutritious Foods for Your Baby
We recommend avoiding processed foods or anything with added salt and sugar. A simple way to adapt family meals is to set aside a portion for your baby before adding these ingredients. Babies can enjoy seasonings, but it’s best to follow their cues and introduce flavors gradually based on their preferences. If you’re looking for recipe inspiration, there are great resources available online, or you can check out books like Baby-Led Weaning Cookbook, Baby-Led Feeding, and The Gentle Eating Book on Kindle.
For those offering purees, start with single-ingredient options with no added sugar. When purchasing store-bought purees, check the ingredient list—it should contain only the main ingredient and possibly water for mixing. While pouches are popular, we recommend glass jars whenever possible, as glass doesn’t leach into the food.
The key to Baby-Led Weaning is preparing foods in a safe and developmentally appropriate way. Start with soft fruits and vegetables—these can be served fresh, steamed, roasted, or boiled. To test if a food is soft enough, press it between your thumb and forefinger; it should squish easily. As your baby gets more comfortable with chewing, you can introduce foods like tender meats, beans, toast, and pasta.
For younger babies, offer food in stick or wedge-sized pieces, about the size and thickness of an adult finger. A crinkle cutter can create ridges in food, making it easier to grip. Once your baby develops a pincer grasp, you can introduce smaller, bite-sized pieces. Always modify round foods like bananas, carrots, and berries by cutting them into quarters, as whole or large chunks can pose a choking risk.
Introducing Foods Safely: What to Know About Allergens and Choking Hazards
This includes honey (until 1 year of age), cow’s milk as a main drink (before 12 months), sticky foods like fruit snacks or dried fruit, and hard or crunchy foods until your child can chew well. Popcorn should be avoided until at least 4 years of age due to choking risk.
Current research suggests that early exposure to potential allergens may help reduce the risk of developing food allergies. This includes foods such as eggs, fish, milk, peanuts, shellfish, soy, tree nuts, sesame, and wheat. It’s recommended to introduce these foods in small amounts, one at a time, while monitoring for any reaction.
Always consult with your pediatrician before introducing new foods, especially if your child has a family history of allergies. We also recommend discussing common symptoms of food allergies and how to respond if a reaction occurs.
Please note that recommendations may vary by country, so check with your healthcare provider for guidance specific to your region.
Key Feeding Guidelines for Both Baby-Led Weaning & Purees
No matter which method you choose—Baby-Led Weaning, purees, or a mix of both—some feeding principles remain the same:
- Seat Your Baby Safely – Always have your child seated in a highchair (or a weaning table for older babies) during meals. This helps create a routine and prevents choking risks by ensuring they are upright.
- Make Mealtime a Family Experience – Eating together allows your baby to observe and learn from you. It builds connection and encourages positive eating habits.
- Set the Right Mood – Aim for a calm, pleasant mealtime. Sessions can last anywhere from five to twenty minutes, depending on your baby’s interest.
- Introduce Utensils & Water Early – Once your baby can bring items to their mouth, offer utensils and a small open cup with just a little water. Learning to sip from a cup helps with coordination and digestion.
- Start Slow & Build Up – Begin with one meal per day and increase as your baby becomes more comfortable. Eventually, you can move to two and then three meals based on their hunger cues.
- Don’t Save Leftovers – Any uneaten food should be discarded to prevent the risk of bacteria and contamination.
By following these guidelines, you’ll create a safe, positive, and engaging mealtime experience for your baby!
Baby-Led Weaning: Encouraging Independence at Mealtime
- Start Simple – Offer just 2-3 pieces of food at a time on the tray, plate, or table to prevent overwhelm.
- Let Them Take the Lead – Allow your child to choose what to pick up and explore. This builds confidence and fine motor skills.
- No Hand-Feeding – Even if they struggle, avoid placing food in their mouth, as this can increase the risk of choking. Instead, offer support by modeling and giving them time to figure it out.
With patience and consistency, your baby will build the skills they need to eat independently!
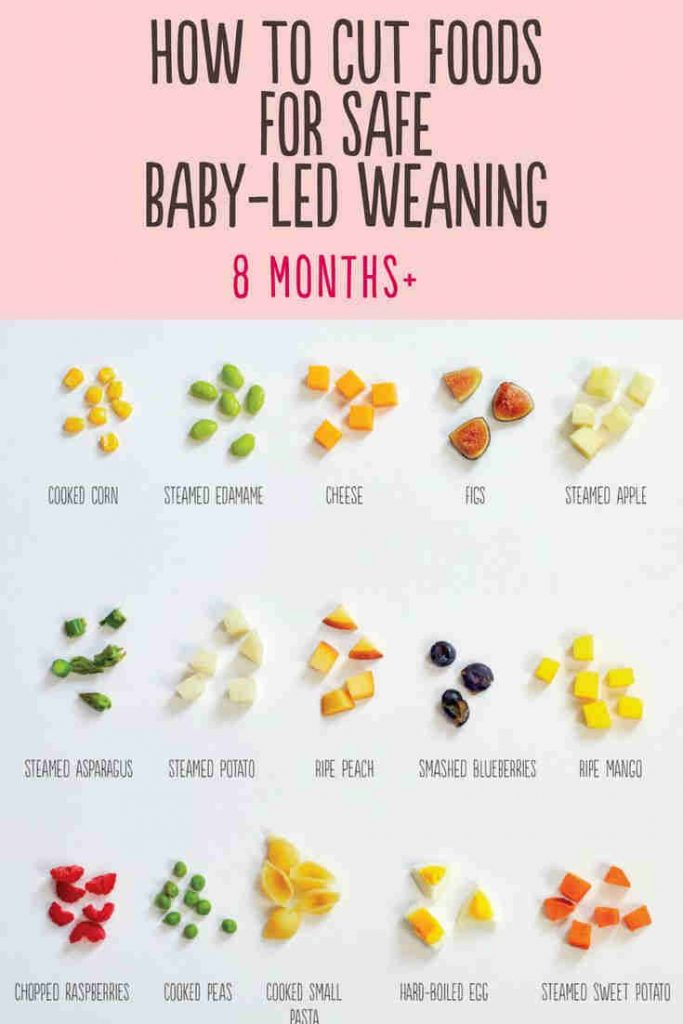
Image from the cookbook Baby -Led Feeding
Purees: A Gentle Introduction to Solids
- Temperature Matters – Serve purees at room temperature or slightly warm. If refrigerated, avoid microwaving directly—this can create hot spots. Instead, warm the food by placing it in a glass bowl or jar and setting it in warm water or running it under hot tap water for a minute or two.
- Portion Wisely – Scoop food out of the jar and into a bowl to prevent cross-contamination, allowing you to store leftovers safely. Most opened jars are good for 24 hours—always check the label.
- Encourage Exploration – In the beginning, pre-load the spoon and offer it to your baby rather than feeding them directly. As their coordination improves, they’ll start dipping and scooping on their own. If they want to explore with their hands, that’s okay too—sensory play is part of the learning process!
Introducing solids can feel overwhelming at first but trust the process and enjoy this exciting milestone with your little one!
We hope this guide gives you the confidence to start your solid food journey with your little one. It’s normal to feel a little nervous, but remember—this is a time for exploration and joy! Savor the messy moments, introduce favorite family foods, and enjoy watching your child discover new flavors and textures.
Visit our Amazon shop for more of our favorite Montessori items.
***Disclaimer – The content of this blog is not intended to be a substitute for professional medical advice and remember different countries may have different recommendations. Always consult with your pediatrician if you have any concerns. ***